vrijdag 30 juni 2017

Examen - Exam


Morgen is het zover.... coupeuse examen


De afgelopen twee jaar tekende ik drie multomappen met patronen bij elkaar via de Rundschau techniek. Een map met kinderkleding. Een map met mantels, mouwen & capuchons. En een map met mantel en blazeruitwerkingen + Kragen en binnenwerk uitwerkingen.


Daarnaast maakte ik allerlei werkstukjes. Onderdelen van jassen, zoals sluitingen, zakken, mouwafwerkingen en kragen. Incl. de bijbehorende patronen.


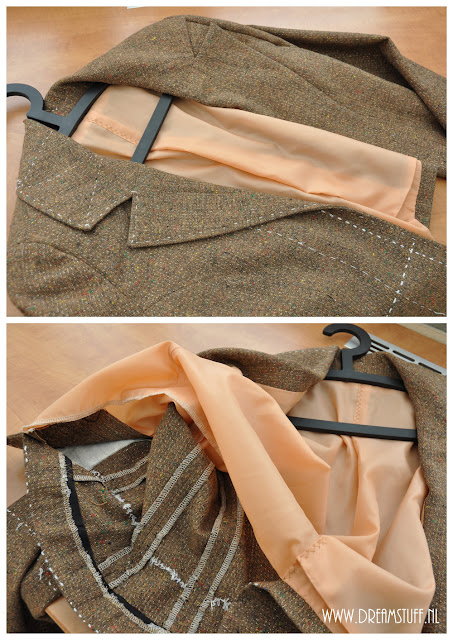
Ook een spiekcolbertje is onderdeel van het curriculum voor het examen. Dat is een colbertje wat gedeeltelijk open is gelaten, zodat je kan spieken hoe de binnenkant is gemaakt. Je tekent het patroon en maakt vervolgens de jas op de couture-manier. Dus met heel veel handwerk....

En je maakt een mantel voor jezelf (of iemand anders). Dat kan een winter of een zomerjas zijn. Je tekent uiteraard het patroon zelf. Ik maakte een dufflecoat of zoals we ook wel zeggen een Houtje-Touwtje jas....  Bovenaan dit bericht staat de inspiratie-modeplaat die ik gemaakt heb....

Morgen op het examen wordt alles "geshowed" (vanavond nog even oefenen op het rechtlopen....) en wordt alles nauwkeurig gecontroleerd door de examinatoren.... Ik ben benieuwd wat ze er van vinden en of ik de aanvullende vragen die ze stellen juist ga beantwoorden....


---

Tomorrow it's exam-day

During the past two years I drew three folders with patterns (using the Rundschau drawingtechnique). A folder with children's clothes. A folder with cloaks, sleeves & hoodies. And a folder with cloak and blazer finishes + Collars and inside components.

In addition, I made all kind of components of jackets, such as closures, pockets, sleeve finishes and collars. Incl. drawing the corresponding patterns.

A "crib-blazer" is also part of the curriculum for the exam. That's a blazer that has been partially left open so you can peek inside, to see how it is made. You draw the pattern and then make the coat in the couture way. So with a lot of handwork ....

And you make a cloak for yourself (or for someone else). That can be a winter or summer coat. You draw the pattern yourself. I made a dufflecoat. At the top of this post you can see the inspiration fashion illustration I made ....

Tomorrow  during the exam everything is presented (tonight doing a bit of rehearsal for the "catwalk" ....) and everything is being carefully checked by the examiners .... I'm curious how they judge and whether I answer the additional questions they ask correctly....


woensdag 28 juni 2017

Eigen oogst - Own harvest


Yeah, de eerste eigen aardbeien.... vorig jaar kocht ik een paar plantjes. De vruchten werden toen opgegeten door de vogels. Heel begrijpelijk, als ik vogel was zou ik er ook van snoepen....

Het werden meer plantjes door stekken. Dit jaar heb ik er een net overheen gespannen. En dat werkt.


Je moet eerst wel geduld hebben totdat ze lekker rood en rijp zijn....


Maar dan kan het oogsten beginnen.... Mmmmmm


Ik bakte van cakebeslag taartbodempjes. 

Vulling is custard room:
30 gr custardpoeder / 250 ml melk / 30 gr suiker
250 ml slagroom / 2 zakjes vanille suiker

Custardpoeder met eetlepel melk en suiker tot vloeibaar papje maken. Verwarm de rest van de melk. Roer het papje erdoor en laat al roerend eventjes koken. Laat de pudding (met plasticfolie afgedekt, om een vel te voorkomen) afkoelen, later ook in koelkast. 
Klop de slagroom stijf met vanille suiker. Roer eetlepel slagroom door pudding (laat langzaam kennis maken) en doe dit mengsel vervolgens bij de rest van de slagroom. En klaar is de custardroom.

De aardbeien gingen bovenop de custardroom en voor de liefhebbers spoot ik nog wat stijfgeklopte slagroom er extra bovenop.

Smullen maar!

P.S.: Heb je een aardbei allergie? Probeer het volgende: doe de aardbeien in kraanwarm water (goed warm!) en roer door elkaar. Hierdoor laten de haartjes los. Haal ze uit het warme water. Spoel ze na in koud water. Uit laten lekken op stukje papieren keukenrol en smikkelen maar. Het werkt voor mij! Sinds mijn vroege jeugd geen aardbeien gegeten tot 3 jaar terug, toen ik dit trucje ontdekte.... en nu eet ik vaak en veel aardbeien Mmmmmm!

---
  
Yeah, my first homegrown strawberries .... last year I bought a few plants. The fruits were then eaten by the birds. Very understandable, if I was a bird I would also nibble at them....

Now I have more plants, via cuttings. This year I've stretched a web over them. And that works! You must be patient until they are red and ripe ....But then the harvest can start .... Yummie


I baked little tarlets and filled them with custard cream.

Custard cream:
30 gr custard powder / 250 ml milk / 30 gr sugar
250 ml cream / some vanilla sugar

Mix custard powder with tablespoon of milk and sugar to get liquid paste. Heat the rest of the milk. Stir the paste in the milk and allow it  to boil for a while (keep stirring!). Allow the pudding to cool down (with plastic foil, to avoid a sheet), also in fridge.
Whip the cream with vanilla sugar. Stir a spoon of cream with cooled pudding, so they get to know eachother. Mix it with the rest of the whipped cream. And you have custard cream

The strawberries went on top of the custard cream. I put some extra whipped cream on top.

Yummie!

P.S .: Do you have a strawberry allergy? Try the following: Put the strawberries in hot tap water and stir. This way the tiny hears get loose. Take them out of the hot water. Rinse them in cold water. Put them on paper, to dry. It works for me! Since my early childhood I haven't eaten any strawberries, until 3 years ago when I discovered this trick .... and now I often eat many strawberries Yummie!


vrijdag 16 juni 2017

DIY - Vaderdag kaarten - Father'sday cards


Zondag is het weer zover: Vaderdag

Wij prijzen ons rijk want we hebben nog twee vaders om op bezoek te gaan.

Twee handgemaakte kaartjes. Uit een reclameblaadje van een mannenkledingwinkel knipte ik plaatjes, plakte het op karton en naaide met het naaimachine figuren. Als je geen naaimachine hebt, kan het natuurlijk ook met naald en draad.

Fijne vaderdag!

---

Sunday it is Father's day again.

We are lucky to have still two fathers to go to.

With clippings from an advertising magazine of a men's clothing shop and some carboard I made these cards. With de sewing machine I sewed some figures on it. If you don't have a sewingmachine you can use needle and thread instead.

Happy Father's day!


zaterdag 10 juni 2017

handgemaakte kaarten - handmade cards


Misschien vervelend voor de "kaartfabrieken" maar, ik maak meestal de kaarten die ik verstuur zelf...

Ik koop ze ook wel eens, maar dan liever bijzondere exemplaren via leuke winkeltjes, internet of goede doelen... Want kaarten sturen doe ik graag, en ontvangen ook natuurlijk ;)

Vaak knutsel ik zelf het één en ander bij elkaar uit tijdschriften, kringloopgeluk spulletjes, verpakkingsmaterialen, etc. 

Deze keer niet. 

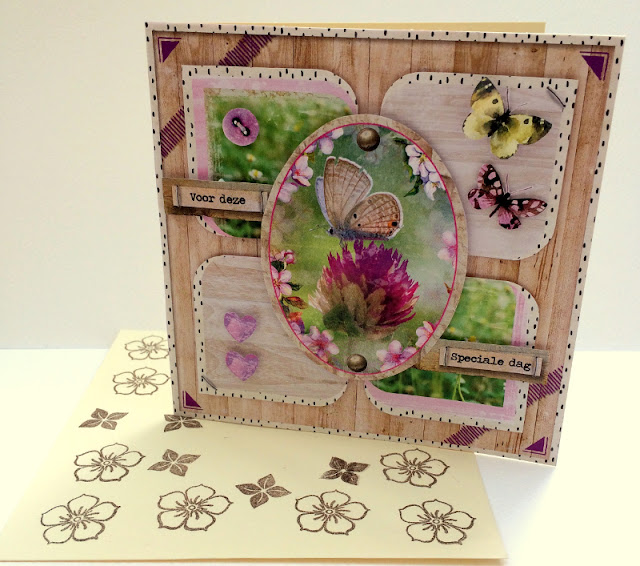
Ik was op zoek naar "iets" in mijn "best wel grote" voorraad knutselspullen, dat gebeurt wel vaker... Hoe groter de voorraad, hoe vaker je moet zoeken.... En kwam daarbij zo'n tijdschrift met knipvellen tegen. Waarschijnlijk een keer cadeau gekregen. Met een schaar, wat karton, stempels, inkt, touw, lijm en van die 3D foam stickers krijg je bijgaand resultaat. 
Best professioneel, vind je niet?

De kaart met 50 was voor onze buren die 50 jaar getrouwd zijn, en de anderen waren voor de moeders op moederdag...


P.S.: Het is hier de laatste tijd rustig geweest..... Ik ben druk met de voorbereidingen voor mijn coupeuse examen op 1 juli, vandaar dat het bloggen op een lager pitje stond. Binnenkort zal ik laten zien wat ik voor het examen aan het maken ben...

---

Perhaps annoying for the "card factories" but I usually make the cards that I send myself ...

I also buy them, but rather special ones via nice shops, internet or charities ... I love sending cards, and ofcourse also like receiving them ;)

 I often mix up my cards with magazines clippings, thriftshop treasures, packaging materials, etc.

Not this time.

I was looking for "something" in my "pretty big" stock, which happens more often ... The bigger the stock, the more you have to search .... And stumbled on a magazine with DIY clipping cards. Probably once received as a gift. With scissors, some cardboard, stamps, ink, rope, glue and those 3D foam stickers you get this result.
Professional look, don't you think?

The card with 50 was for our neighbors who were married for 50 years, and the others were for the mothers on Mother's Day ...

P.S.: It's been silent here lately ..... I'm busy with the preparations for my sewing exam on July 1st, so had not so much time for blogging. Soon I will show what I'm doing for the exam 

Related Posts Plugin for WordPress, Blogger...